In many fields of science standard data formats are used. Here we describe packages which implement a few of these standards, thus allowing Python users ready access to such data.
NetCDF is a format developed by the Unidata project of the University Corporation for Atmospheric Research. Maintenance and further development has been taken over by the National Center for Atmospheric Research (NCAR). NetCDF is used in a wide variety of fields outside of the atmospheric sciences due to its simplicity, robustness, and ability do provide information about the contents of a data file within the file itself, so called metadata.
NetCDF stores data in the form of multidimensional arrays. Each array is called a variable. Associated with each variable is information about its dimensionality, size along each axis, the data type of the array elements, and attributes of the variable, including such things as units and missing values which indicate when data do not exist for particular elements. Information is also stored separately about the dimensions of variables existing in the file. Not all variables have to have the same number of dimensions – variables can even be zero-dimensional, or scalars. Dimensions are fixed in length and cannot be changed in an existing NetCDF file with the exception of one, called the unlimited dimension. This is provided so that a file can be expanded along that dimension. Typically this dimension is used to provide, for example, records of variables at successive times.
In addition to the above, the NetCDF file may contain global attributes which provide overall information about the data in the file. A prime example is the history attribute, which contains a record of what has been done to the file. Attributes can take the form of numbers or strings, or tuples of these data types. NetCDF imposes no preconditions on the type or number of attributes, though useful conventions have developed in particular scientific fields.
We have modified the Python 2 package for NetCDF called “pupynere” so that it works with Python 3. This interface is described here. Pupynere is a NetCDF3 interface. NetCDF4 is an extension to NetCDF3 that also accesses certain forms of HDF-5 files. Pupynere cannot access HDF-5.
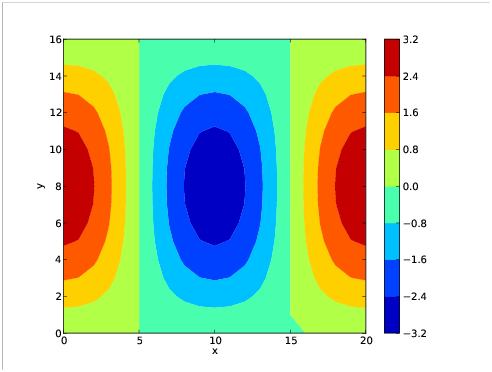
As our first example, here is a Python script which creates an example of a two-dimensional array, which is plotted and then written to a NetCDF file:
#!/usr/bin/python

# Create a sample netcdf file.
from numpy import *
from pupynere import *
import matplotlib.pyplot as plt

# Use Roberto De Almeida's Pupynere NetCDF package, which is written
# totally in Python.

# Create some interesting fields.
x = linspace(0,20,21)
y = linspace(0,16,17)

# A mis-feature of meshgrid is that it assumes that the most rapidly
# varying index in accessing sequential positions in memory is the
# first one.  However, consistent with the C-array-type default of
# NumPy, the last index should vary most rapidly.  The netCDF package
# follows the default NumPy convention, so we reverse x and y here to
# limit the spread of this contagion.
(Y,X) = meshgrid(y,x)
a = 3*cos(6.28318*X/20)*sin(3.14159*Y/16)

# Plot our new function to see what it looks like.  Notice that we
# have to take the transpose of a to make it plot correctly, in
# agreement with the above comment.  This wouldn't need to be done
# if we had not reversed the order of x and y in the call to meshgrid.
# However, it would have then caused problems later in the creation
# of the NetCDF file.
c = plt.contourf(x,y,a.transpose())
ax = plt.axis([0,20,0,16])
b = plt.colorbar(c,orientation='vertical')
xl = plt.xlabel("x")
yl = plt.ylabel("y")
plt.show()

# Write them to a netcdf file.
f = netcdf_file('create_example_nc.nc','w')
setattr(f,'history','sample nc file from Python')
dx = f.createDimension('x',21)
dy = f.createDimension('y',17)
xvar = f.createVariable('x','f4',('x',))
yvar = f.createVariable('y','f4',('y',))
avar = f.createVariable('a','f4',('x','y'))
svar = f.createVariable('s','i4',())

# The indexing on the left sides of the assignments below is needed to
# tell Python that the netcdf variables should be assigned the values
# of the corresponding arrays, not just redefined out of existence!
xvar[:] = x[:]
yvar[:] = y[:]
avar[:,:] = a[:]

# A different technique is used to assign a value to a scalar variable,
# since the array slicing technique doesn't work in that case.
svar.assignValue(42)

# A convention used in many applications of NetCDF is that a missing
# value be specified, indicating the existence of missing data in grid
# cells this occurs.
setattr(xvar,'missing_value',1.e30)
setattr(yvar,'missing_value',1.e30)
setattr(avar,'missing_value',1.e30)
setattr(svar,'missing_value',99999)
f.close()
The plot of the variable "a" is shown in figure 5.1.
The above Python script is largely self-explanatory and covers most of what one needs to do to write a new NetCDF file from scratch. If one desires to make one of the dimensions the unlimited dimension, assign it a length of 0 or None in the f.createDimension variable. If one of the variables is a scalar, the assignValue method must be used instead of the direct assignment.
Reading a NetCDF file takes some different techniques. After importing NumPy and Pupynere in the usual way, we open a NetCDF file for reading:
>>> from numpy import *
>>> from netCDF3 import *
>>> f = netcdf_file('create_example_nc.nc','r')
>>>
Determine the dimensions defined in a NetCDF file as follows:
>>> f.dimensions
{'y': 17, 'x': 21}
>>>
The names of variables can be extracted:
>>> f.variables.keys()
dict_keys(['y', 'a', 'x', 's'])
>>>
We can extract the actual variables as follows:
>>> xvar = f.variables['x']
>>> yvar = f.variables['y']
>>> avar = f.variables['a']
>>> svar = f.variables['s']
>>>
Various important aspects of the variables can be extracted, such as the shape,
>>> xvar.shape
(21,)
>>> avar.shape
(21, 17)
>>> svar.shape
()
>>>
the dimensions of each variable,
>>> avar.dimensions
('x', 'y')
>>>
and whether the variable is a record variable:
>>> yvar.isrec
False
>>>
The data for arrays can then be transferred to a NumPy variable by simple assignment:
>>> a = avar.data
>>> a
array([[  0.00000000e+00,   5.85270464e-01,   1.14804935e+00,
          1.66670942e+00,   2.12131882e+00,   2.49440742e+00,
          2.77163744e+00,   2.94235516e+00,   3.00000000e+00,
          2.94235682e+00,   2.77164054e+00,   2.49441195e+00,
          2.12132454e+00,   1.66671610e+00,   1.14805675e+00,
          5.85278273e-01,   7.96076893e-06],
       [  0.00000000e+00,   5.56625366e-01,   1.09185994e+00,
...
       [  0.00000000e+00,   5.85270464e-01,   1.14804935e+00,
          1.66670942e+00,   2.12131882e+00,   2.49440742e+00,
          2.77163744e+00,   2.94235516e+00,   3.00000000e+00,
          2.94235682e+00,   2.77164054e+00,   2.49441195e+00,
          2.12132454e+00,   1.66671610e+00,   1.14805675e+00,
          5.85278273e-01,   7.96076893e-06]], dtype=float32)
>>>
(Not all of the data for this rather large array are shown.) Plotting
shows that we end up with the same array a with which we
started. Scalar variable data can be transferred by the getValue()
method:
>>> svar = f.variables['s']
>>> s = svar.getValue()
>>> s
array([42])
>>>
Global and variable-specific attributes can be obtained if their names are known (use “ncdump -h” to determine these):
>>> f.comment
'sample nc file from Python'
>>>
>>> avar.missing_value
1e+30
>>>
Candis is a file format for gridded numerical data. It adopts the “filter” philosophy of Unix and Linux, in which the desired result is generated by the application of small, specialized applications linked together by the Unix pipe mechanism. Candis works on Unix, Linux, and Mac OS-X systems. Windows in any form is problematic. This section describes the Candis interface for Python 3 called Py3io.
Conceptually, a Candis file consists of 4 parts: (1) a "comment" section, which contains arbitrary text describing typically what has been done to the file; (2) a "parameters" section containing scalar variable-value pairs; (3) a "static fields" section containing data fields of which only a single instance is needed; and (4) a "variable fields" section containing data fields for which a sequence of one or more instances are defined in the Candis format. These instances represent, for instance, the values of the variable fields at successive times or possibly successive levels in numerical model output. The meaning of multiple instances is left up to the user. The Python representation of a Candis file contains a single instance of the variable fields at any given time, and methods (described below) are available to scan sequentially through successive instances. This division into successive instances allows allows in principle very large Candis files to be defined without having to read the entire file into (virtual) memory at one time. However, due to design tradeoffs, Py3io reads the entire Candis file into memory at once. The cheapness of computer memory makes it possible to use Py3io for very large files in spite of this characteristic.
A "field" contains a zero to four dimensional array of 32 bit floating point numbers as well as information describing the size and shape of the array. Also included is an ASCII name for the field as well as the names of the dimensions associated with the array axes. Each of the dimensions is associated with a one-dimensional static field called an "index field" which gives the values of the variable associated with that axis. There can be no more than 4 dimensions in a Candis file.
Parameters occasionally have been used to document values used in the creation or modification of the file. However, this option isn’t much exercised. There are two additional uses: (1) The "bad" and "badlim" parameters are positive floating point numbers. "badlim" specifies the maximum absolute value a field element can take on and still be considered "good" data. "bad" is the preferred value used to indicate bad or missing data elements, though any value greater than "badlim" will do. If missing, default values are 1e30 for bad and 0.999e30 for badlim. The values of the bad and badlim parameters apply globally to all fields. (2) Redundant information about the starting and step values for index fields is present for historical reasons and is represented as parameters. The normal end user doesn’t have to worry about these parameters, as Py3io takes care of them automatically. The only reason to be concerned about parameters is if non-default values of bad and badlim are needed. Py3io deletes all parameters except bad and badlim and regenerates the parameters related to index fields every time a file is processed. This eliminates a source of confusion that occurs when multiple conflicting copies of parameters build up over successive passes through traditional Candis filters. Parameters (with the exception of bad and badlim) were probably a bad design decision, and Py3io thus discourages their use. The parameters related to index fields are particularly problematic, as unequally spaced dimension values are impossible to represent correctly. However, these parameters are reluctantly included, as some traditional Candis filters require them.
Within Py3io, a Candis object represents the comments as a list of strings, the parameters as a list of name-value pairs, and the static and variable fields as lists of sublists, each sublist containing the data and metadata for each field.
The data are represented in the form of a list of NumPy arrays, one list element for each variable slice. C format is used, i.e., the last dimension iterates most rapidly as one steps through memory. The metadata includes the size and shape of the array and the dimension names associated with each array axis. (There are a few other minor pieces of information present for historical reasons which are of no concern to the end user.)
The following Python program shows how to write Candis files using the Pycandis package:
#!/usr/bin/python
# Create a sample Candis file.
from numpy import *
from py3io import *


# Create index field data.
nx = 21
ny = 17
x = linspace(0,20,nx)
y = linspace(0,16,ny)

# A mis-feature of meshgrid is that it assumes that the most rapidly
# varying index in accessing sequential positions in memory is the
# first one.  However, consistent with the C-array-type default of
# NumPy, the last index should vary most rapidly.  The Candis package
# follows the default NumPy convention, so we reverse x and y here to
# limit the spread of this contagion.
(Y,X) = meshgrid(y,x)

# Generate a Candis file with 2 variable slices.
c = candis()

# Comments.
c.add_comment('sample Candis file from Python')
c.add_comment('this has 2 variable slices')

# Set up dimensions
c.add_dim('x',nx,x)
c.add_dim('y',ny,y)

# Create the data for the first and second variable slices and
# put them into a list
alist = []
a1 = 3*cos(6.28318*X/20)*sin(3.14159*Y/16)
alist.append(a1)
a2 = 3*sin(6.28318*X/20)*cos(3.14159*Y/16)
alist.append(a2)

# Add a 2-D field with name a -- note that both variable slices
# are included in the list
c.add_vfield2('a','x','y',alist)

# add a 0-D field
solo1 = array([5.3])
solo2 = array([27.0])
c.add_vfield0('solo',[solo1,solo2])

# Finish by writing the file to the standard output
c.put_candis('-')
To write to a named file, substitute the file name in the argument of c.put_candis. Note that there is a separate ’add_vfield...’ method for dimensions between 0 and 4.
To read a Candis file, first import the needed packages, generate an empty candis object, and import a Candis file into it. Here we import the file created in the above section, which we have named ’py3io_example1.cdf’.
>>> from numpy import *
>>> from py3io import *
>>> c = candis()
>>> c.get_candis('py3io_example1.cdf')
True
>>>
We first examine the contents of the file to determine what is there.
>>> c.get_comment_info()
['sample Candis file from Python', 'this has 2 variable slices']
>>> c.get_param_info()
[['bad', '1.e30'], ['badlim', '9.99e29']]
>>> c.get_dim_info()
[['x', '21'], ['y', '17']]
>>> c.get_vfield_info()
[['a', 'x', 'y'], ['solo']]
>>>
The index field-related parameters are not included, as they are discarded on input and regenerated on output. The returned dimension information is in the form of a list of sublists, each containing the dimension name and size. The variable slice list contains sublists showing the variable field name and its associated dimensions. These methods are not only good for visual inspection – they can be used by a general purpose Python filter to obtain the contents of a file.
As a convenience, we can get the value of a particular parameter in string form.
>>> c.get_param('bad')
'1.e30'
>>>
We can also get the field values. (Note that the output for field ’a’ has been abbreviated for brevity.)
>>> c.get_field('a')
[array([  0.00000000e+00,   5.85270464e-01,   1.14804935e+00,
         1.66670942e+00,   2.12131882e+00,   2.49440742e+00,
...
         2.49441195e+00,   2.12132454e+00,   1.66671610e+00,
         1.14805675e+00,   5.85278273e-01,   7.96076893e-06],
 dtype=float32), ['x', 'y']]
>>> c.get_field('solo')
[array([ 5.30000019], dtype=float32), []]
The field values for ’a’ are presented in ’flat’ form. If a shaped form is desired, this may be obtained also.
>>> c.get_field_shaped('a')
[array([[  0.00000000e+00,   5.85270464e-01,   1.14804935e+00,
          1.66670942e+00,   2.12131882e+00,   2.49440742e+00,
          2.77163744e+00,   2.94235516e+00,   3.00000000e+00,
          2.94235682e+00,   2.77164054e+00,   2.49441195e+00,
          2.12132454e+00,   1.66671610e+00,   1.14805675e+00,
          5.85278273e-01,   7.96076893e-06],
       [  0.00000000e+00,   5.56625366e-01,   1.09185994e+00,
          1.58513498e+00,   2.01749444e+00,   2.37232256e+00,
...
          2.01749635e+00,   1.58513856e+00,   1.09186506e+00,
          5.56631804e-01,   7.57112912e-06],
       [  0.00000000e+00,   5.85270464e-01,   1.14804935e+00,
          1.66670942e+00,   2.12131882e+00,   2.49440742e+00,
          2.77163744e+00,   2.94235516e+00,   3.00000000e+00,
          2.94235682e+00,   2.77164054e+00,   2.49441195e+00,
          2.12132454e+00,   1.66671610e+00,   1.14805675e+00,
          5.85278273e-01,   7.96076893e-06]],
 dtype=float32), ['x', 'y']]
>>>
The results of these methods can be assigned to variables for further analysis. Notice that in both cases the output is in the form of a list, with the first element of the list being the NumPy array and the second being a list of associated dimensions.
The above calls produce the content of the first variable slice. We step to the next slice with the following command.
>>> c.get_next_slice()
True
The returned ’True’ indicates that there was an additional slice to be found. Looking at the value of the variable ’solo’
>>> c.get_field('solo')
[array([ 27.], dtype=float32), []]
>>>
shows that indeed the value of ’solo’ in the second slice is returned.
A new call to advance to the next slice
>>> c.get_next_slice()
False
shows by the returned ’False’ that there is no subsequent slice, consistent with the form of the example file created in the above subsection.
The Python 2 interface to Candis is called Pycandis. It was written by former NM Tech student Max Brister. Unfortunately, this package is difficult to port to Python 3. Its description is included here since Python 2 is still used.
The following Python program shows how to write Candis files using the Pycandis package:
#!/usr/bin/python
# Create a sample Candis file.
# Use the Pycandis package of Max Brister.
from numpy import *
from pycandis import *


# Create index field data.
nx = 21
ny = 17
x = linspace(0,20,nx)
y = linspace(0,16,ny)

# A mis-feature of meshgrid is that it assumes that the most rapidly
# varying index in accessing sequential positions in memory is the
# first one.  However, consistent with the C-array-type default of
# NumPy, the last index should vary most rapidly.  The Candis package
# follows the default NumPy convention, so we reverse x and y here to
# limit the spread of this contagion.
(Y,X) = meshgrid(y,x)

# Generate a Candis file with 2 variable slices.
c = Candis()

# Comments.
c.comments.append('sample Candis file from Python')
c.comments.append('this has 2 variable slices')

# A random parameter.
c.params['answer'] = 42

# Set up static index fields with contents added here.
c.sfields['x'] = Field(['x'], x)
c.sfields['y'] = Field(['y'], y)

# Set up zeroed variable fields with actual contents added later.
c.vfields['a'] = Field(['x', 'y'], zeros([nx,ny]))

# For zero dimensional field (a scalar), Pycandis knows that a
# scalar value rather than an array is the second argument.
c.vfields['slice'] = Field([], 0)

# Create a first variable slice after creating field a.
a = 3*cos(6.28318*X/20)*sin(3.14159*Y/16)
c.vfields['a'].data = a

# Note the special treatment of a scalar variable.
c.vfields['slice'].data.flat = 1

# Write header, static slice and first variable slice.
c.write('create_example_cdf.cdf')

# Create a second variable slice.
a = 3*sin(6.28318*X/20)*cos(3.14159*Y/16)
c.vfields['a'].data = a
c.vfields['slice'].data.flat = 2

# Write second variable slice.  (Pycandis remembers that header
# and static slice have already been written.)
c.write('create_example_cdf.cdf')

# Finish
c.close()
To write to the standard output, omit the file name in the call to
c.write().
To read a Candis file, first import the needed packages and generate an empty Candis object:
>>> from numpy import *
>>> from pycandis import *
>>> c = Candis()
>>>
We will look at the Candis file generated by the Python program illustrated in the previous section. Let’s read in the header, the static slice, and the first variable slice of this file:
>>> c.read('create_example_cdf.cdf')
True
>>>
The returned “True” indicates that the operation succeeded.
We can look at the comments,
>>> c.comments()
['sample Candis file from Python', 'this has 2 variable slices']
>>>
the parameter names,
>>> c.params.keys()
['badlim', 'bad', 'dx', 'dy', 'answer', 'y0', 'x0']
>>>
and the static and variable file names:
>>> c.sfields.keys()
['y', 'x']
>>> c.vfields.keys()
['a', 'slice']
>>>
The values stored in parameters and fields may be examined:
>>> c.params['answer']
42.0
>>> c.sfields['y'].data
array([  0.,   1.,   2.,   3.,   4.,   5.,   6.,   7.,   8.,   9.,  10.,
        11.,  12.,  13.,  14.,  15.,  16.], dtype=float32)
>>> c.vfields['a'].dims
['x', 'y']
>>> c.vfields['slice'].data
array(1.0, dtype=float32)
They may also be extracted for further use:
>>> a = c.params['answer']
>>> print (a)
42.0
>>> y = c.sfields['y'].data
>>> print (y)
[  0.   1.   2.   3.   4.   5.   6.   7.   8.   9.  10.  11.  12.  13.  14.
  15.  16.]
>>> slice = c.vfields['slice'].data
>>> print (slice)
1.0
>>>
Call the read command again to get the second variable slice:
>>> c.read('create_example_cdf.cdf')
True
>>> slice = c.vfields['slice'].data
>>> print (slice)
2.0
>>>
Notice what happens when we try to read the third (non-existent) variable slice:
>>> c.read('create_example_cdf.cdf')
False
>>>
If the Candis file of interest has only one variable slice, a single convenience command can be used to read the entire file in one statement:
>>> d = ReadCandis("single_slice.cdf")
>>>
Everything else works as above. (This also works for files with multiple variable slices, but additional “read” statements are required to access variable slices other than the first.)
If it is desired to read a Candis file from the standard input, omit the file name in the read and ReadCandis calls. For example:
>>> d = ReadCandis()
Information on NetCDF may be obtained from the National Center for Atmospheric Research at http://www.unidata.ucar.edu/software/netcdf/.
Jeffrey Whitaker of the National Oceanic and Atmospheric Adminstration’s Physical Sciences Division of the Earth System Research Laboratory (http://www.cdc.noaa.gov/) has developed a Python package for NetCDF4; http://code.google.com/p/netcdf4-python/. So far I have been unable to get this package to compile.
Roberto De Almeida (http://dealmeida.net/projects/), a Brazilian oceanographer, has created a package named ’pupynere’ for NetCDF version 3 which is written totally in Python using the Python memory map module. This package almost works after converting to Python 3 with the conversion program ’2to3’. I now have fixed the obvious problems, and a beta version of pupynere is now included in the Candis distribution.
David Raymond and collaborators in the Physics Department at New Mexico Tech (http://physics.nmt.edu/~raymond/tools.html) wrote the Candis system. Undergraduate student Max Brister wrote the Python package Pycandis and Raymond wrote Py3io. Both are included in Candis.